Pattern Review: Butterick 6659 Option F Girls Short Pajama Bottoms

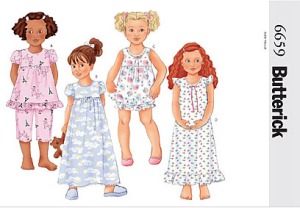
Butterick 6659: I am using Option F, the baby doll PJ bottom.

My daughter likes to wear shorts and a t-shirt to bed.  This year we had plenty of tees, but few PJ bottoms.  To keep her from parading around the house in her unders, I decided to sew up some quick pajama shorts.

Previously I had made a nightgown from this pattern and was on the verge of discarding it, when I thought that it could easily be graded up slightly, (the original being so oversized,) and I might be able to make the panties into shorts by omitting the elastic at the legs.  Why buy a fresh gym shorts pattern when I already had essentially the same thing.

I also had a laundry basket of discarded summer tees.  For once, I had the spare fabric to finally perfect fitting the crotch seams for my daughter – something I can transfer to other patterns. 

The pink shorts are the RTW pair that I want to emulate. The first try at the unaltered pattern is the yellow pair and you can see how much larger they are than the RTW. The yellow pair bagged in the front waist when my daughter tried them on.

Pros:

Though this pattern was cut for a size 5, it easily fit my 6X/7 Slim sized daughter.

Very few seams making it a quick sew.  One for which you soon have a finished project and have not expended a lot of mental attention – perfect for mothers of young children.

One pattern piece along with a cut of elastic.

If you only have five or ten minutes to sew, you will be able to cut and sew this pattern in just a few sessions.

Cons:

If your child is a tricky fit there aren’t a lot of seams to work with.

The pattern sizing – sigh!  Has no one in the industry redesigned children’s patterns to match RTW?  The waistline of this pattern is at the natural waistline while my daughter and her little friends barely know where their waists are located.  They all wear their pants at the navel and I consistently have to adjust children’s patterns to follow suit.  This one is no exception. 

The length of the lower hemline option seems much too long to me.  Again little girls wear their gym-style shorts upper mid-thigh rather than towards the knee.

I didn’t dare try a 4-line stitched elastic waistband as the elastic grows and distorts whenever I try this.

Some Assembly Required:

I sewed the crotch seams, then inserted the elastic waistband.  The original RTW shorts I was copying have a 4-line stitching of the elastic.  I find the elastic grows and stiffens if sewn over so many times, so I settled on the simplest elastic application. 

Fabric:  Old T-shirt fabric.

Finetuning:

Sadly my serger appears to be going kapoot, so I did not serge the seams.  Instead I did a double line of zig-zag stitching.  It isn’t the most professional inside finish, however the material is knit so it won’t ravel.  And old t-shirt knit at that allowing me to more easily justify the simpler finish .

The final pair and how they compare to the original pink RTW. Much better.

Will I Sew it Again:

Yes, definitely.  I finally got the pattern adjusted to fit perfectly.  Now I only have to grade up for at least the next two sizes.  

Advice to Others:

I sewed four pairs in all but one has gone missing.

Use an old tee to make the practice muslin if yours are wide enough for the pattern piece.  And if you do use a t-shirt, utilize the RTW hemline for the shorts hemline saving you an extra step and making the garment look more RTW, as I have always found that the standard mechanical machine’s zig-zag stitch does not much resemble a RTW finish.

Overall Style Grade:  Um, A – I guess.  This is such a classic that it hardly seems a style.

Results Grade: A, after you finetune the fit, you will get consistently good results.

My Daughter has Decided that She Isn’t a Ruffly Girl Anymore.

Should she be allowed to do that! 

All on her own. Without any say-so from her mother.  :-0

Here is a pile of patterns ready to donate to the thrift store that are no longer “her”.  “Those aren’t my style, Mommy.  I’m not a ruffly girl anymore.” 

What is wrong with a little ruffle?

And when did she get old enough to have a style?!

 I am not ready to go from this . . .

         to this. . . .


 What am I going to sew her now?  The dresses I made her last autumn to fit her this summer – she won’t wear.  Too ruffly, I suppose.

It also means she is growing up.  I love the family years and already feel nostaglic when I see signs she is no longer my itty-bitty girl.

What is a mother to do?

I guess hit a sale at the fabric store and buy more patterns!  Proof that every cloud has a silver lining. 🙂

Getting the Fabric for Free

The price of knit fabric has gone up in my area and the design of many kid knit patterns leans towards the dorky and ill-fitting. (I love you pattern companies – but sorry, it’s true.)  Additionally, children’s patterns are often so oversized that they are unwearable and the contours are not updated to current fashion.   The end product, though well-sewn, can look a little “off” and the kid just won’t wear the garments.  The “off”-ness also screams home-sewn, but not in a good way.

But having some basic knit patterns for kids can be essential.  Kids sleepwear can be as expensive as daywear and I sometimes want to quickly create an easy top or bottom for playtime or to accessorize a more intricate garment. 

That means I need to spend some time customizing some kid knit patterns.  I have chosen these to work with.

Butterick 5510: I am looking at the knit tee and bottom as a source for summer pj’s.

Kwik-Sew 3043: Kwik-Sew usually has such great standard patterns that I actually traced this one hoping to refine a top pattern that I can easily sew in my daughter’s school uniform colors.

Butterick 6659: I have made this before and it is hugely oversized. My daughter who is a 6X can easily wear the size 5. I am looking at making her a few sleeveless nightgowns and using the pants and panties as PJ bottoms.

And I am getting the fabric for free.

From where? 

From here – the great motherload of free fabric.

Our closet.

Summer is such a short season but my family sure runs through the summer clothes.  Between the summer gardening and the summer sweating we manage to grime up quite a bit of our wardrobe each season.   A recent purge of my husband and my closet resulted in the above basket of cast-offs.

I could have thrown them away or made more cleaning cloths, but this year I decided to consider this a source of free material to create practice muslins and summer jim-jams.  With the new baby getting any sewing time has been so hard, but I am hoping that these small projects can be managed.  And if I ruin it, who cares, it was a cast-off tee.

I am looking forward to getting started! 🙂

Pattern Review:McCall’s 5678 Baby Sling Option B

McCall’s 5678 Baby Sling Option B

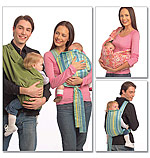
McCall's 5678 Baby Slings

Option A, the green one the man is wearing, does not look like you can free your hands so I didn’t bother making it.  I have something a friend gave me, a serendipity wrap I believe it is called, it is about twelve feet of bright batik green fabric; if you wrap outdoors the fabric drags on concrete and my husband will not wear it because it the print is too feminine.  (But I included the  link just in case it works for you as it looks really cool on the babywearing site. ) Baby is approaching separation anxiety stage meaning I have to wear him to get anything done.  Option B looks like a rectangle with ties attached and I thought it would work up quickly and allow me to use up some of my stash.   Also my hands could be free at least some of the time.

Pros:

  1. After you make the first sling, you will find ways to shorten the process.
  2. You can make several in different fabrics having fun with various print and color combinations.
  3. It is washable.
  4. It can be adjusted to fit each individual unlike some of the commercial baby carriers where once you have the straps adjusted it is a pain to readjust if you want your husband to carry the baby for awhile.
  5. Your hands can be free some of the time, at least long enough to use a broom or mop.
  6. After you learn the technique it makes a great baby gift, though you will have to teach the recipient how to wear it, and remind her that it can only be used after the baby is 4 months old and can hold up his/her head well.

    Clearly I wasn't prepared for a photograph and I had to hold the camera at a strange angle but you can see the denim sling and that it does safely hold a baby.

Cons:

  1. Looks are deceiving.  This is not a beginner project.
  2. The instructions make it take longer than need be.
  3. The body is sewn like a pillow right sides together. On the final sew-around all four straps plus the padded top are shoved to the inside and keeping all of that stuff out of your line of seaming can be tricky.
  4. Babies have strong opinions on their slings, and you could spend the time making it to find your baby hates it.  My firstborn hated every sling we tried, but I had not used one like this which resembles a mei tai sling. (Here are some photos of that type.)
  5. You cannot bend forward with this sling.  You must bend at the knee with your back straight.  This is tiresome when doing certain household chores.

Some Assembly Required:

The instructions have you baste the fleece onto the straps before completing them.  Do it per the instructions the first time, but after that an intermediate sewer will quickly see how it can be done in one pass.

I took the extra time and basted the fleece onto the body both times as it is several layers of sewing on this piece. 

After inserting straps and padded top, create a double line of seaming topstitch the straps down inside the body for extra strength.

Fabric:

The body can be a bit stiffer than the straps but regular cotton will also do.  I recommend quilting cotton for the straps as you will be tying these and will need some pliability. I used denim and batik for the first sling, and a fanciful quilting cotton for the second.

The second sling in fun fabric. I forget who gave me this fabric with a print of dogs posing as cowboys but this is the only use I can imagine using it for.

Finetuning:

I used some of my stash for these two slings, but finding yardage long enough for the straps was a bit hard.  You can piece the straps towards the ends, but I would want one solid piece near the body.

Will I Sew it Again:

Maybe.  Depends on how long these two last.  I have a friend who is pregnant and I hope it is a little girl as I am dying to make one of these up in coordinating girlie pink fabrics. 🙂

Advice to Others:

You must give me grace because the baby kept hitting the camera though it wasn't quite this blurry on my digital screen. Hopefully you can still see my mistake where the red doesn't quite meet up with the blue. I should have taken more care in pinning and cleaning up the edges of my strap.

Remember after you sew the straps to tidy up the edges or you may have some skips in your seaming because your stitch line just missed the fabric edge. 

Mark the top of the body because once you take off the pattern you won’t be able to figure it out.  It is a little counterintuitive but the smaller end goes on bottom, so the baby’s legs can stick out, and the larger side goes on top to surround the baby at the shoulder.

If you have a post-partum abdominal separation (diastis recti) or weak upper back muscles you must remember to pull your shoulders back and down, and your bellybutton up and in when wearing the sling.  Check out Julie Tupler,  a physical therapist who helps pregnant and post-partum women get back into shape and reduce their bellies.  She warns that care must be used when wearing front carry baby slings.

 Overall Style Grade:  A, This could be very cute, especially if you bought some designer quilting cotton.

Results Grade: A, for advanced beginners or beyond.  If I were new to sewing I might find it a bit frustrating.

Knitting:Child’s Vest:Live and Learn

“This explains why my answer to a question once asked – “What is the most common mistake knitter’s make?” – was that they follow the pattern.  There are directions in every pattern that you should never follow blindly.”

Sally Melville, knitwear designer and teacher from “Mother-Daughter Knits” page 17

In order to become a better sewer one must eventually stop following pattern instructions to the tee.  As you learn what works and what doesn’t some mistakes are made at first, but in the end you are a better and more confident sewer.

Though the initial mess-ups are admittedly disappointing one must perservere.    

As in sewing, so also goes knitting.

I used The Knitter’s Handy Book of Patterns by Ann Budd to create a small school sweater for my daughter.  Unlike typical knitting patterns that tell you what type of yarn to purchase, Budd provides detailed charts for various gauges of yarn, along with various sizes from child to adult male.  The designs given are basic and you can add any special stitches or embellishments you desire.

My daughter is now 6 1/2 but barely fits a size six and is on the short side.  In the past I have made this same vest from the same instructions which I followed to the tee, and it came out badly.  Not right for my daughter’s proportions.  I discovered what Melville articulates, even the best instructions should not be followed blindly.

That was two years ago and now with all of the couch time I am logging with the pregnancy anemia I decided that I had both hours and calm to attempt a customization.

Ann Budd is an amazing knitter and I am so thankful she has taken the time to work out all of these different sizes and yarn gauges.  I feel that I can learn a lot from making these basic designs.  But as with my first forays outside of the instructions provided in the sewing pattern envelopes I have made some blunders.  Experience is the only true teacher for so much of crafting. 

I lengthened the torso and shortened the armhole per what my measuring tape and my daughter were instructing me.  What I did not take into account was that the original neckline began at the starting point of the original armhole.  When I shortened the armhole, I also shortened the neckline. 

Uh-oh. 

That bane of home knitting, the handmade garment that you must wrestle over the child’s head!

The neckline was too small.  I had to rip out the original 3/4 inch ribbing, which looked best with the ribbing at the waist. Three tries in all before I got it so I could pull the sweater over her head, finally successful with a considerably smaller ribbing which isn’t as pretty with the garment.  If any of you are also knitters you know that three ripouts is enough to make a person testy. Hopefully the experience burnt some things into my brain.

Two things to remember about knitted necklines:

  1. Measure them!
  2. The ribbing or other edging shrinks the hole, so think about what size edging is desired and take that out of the garment’s neck area.

The other thing I learnedDo get off one’s duff and hunt down or buy the correct size knitting needles even if one must delay the project midway

An example of circular needles

I began knitting the body of the garment from the waist up with circulars, size 8.  When I had to divide the sweater and work on the back and front separately I used my straight needles,  also a size 8.  Size 8 with the straights was tighter than size 8 with the circulars.  Should have stopped, took a little trip to the craft store and bought a set of size 9 straights.  I didn’t think the change would be so noticeable.

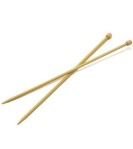
Straight or Single Point Knitting Needles

Now I can see the line where I changed needles and it really bugs me.

As in sewing, my first customization has turned out so-so but I have learned a lot, more than I ever could just by reading about technique or looking at pattern illustrations. Thankfully my daughter is young and her clothes are small and quick to make as I am eager to take what I have learned and try again.  As she is only in first grade and I figure I have got several years to master this.  By the time she is in middle school I should be whipping these things out!

My Short Rows Have Holes at the Ends

As anemia has sapped my strength I spend hours sitting around.  For awhile I was watching TV, but the only thing on is the rehashing of the Casey Anthony trial and nothing new is being discussed.  Even reading has gotten old and I tend to nod off.  Now in order to wrest some productivity from my enforced leisure I have picked some knitting back up. 

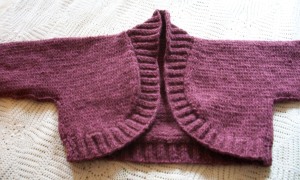
I go through phases where I knit more than others. I knitted some dishcloths recently and then decided on a girl’s sweater as another quick project.  This one is from Debbie Bliss in her book Junior Knits.  It is a little bolero made of standard worsted yarn. 

I enjoyed knitting it.  My daughter likes the sweater and I see only three mistakes that I would like to correct in my next sweater. 

1.) The first is the seaming of the underarms shows on the outside.  I just need to get off my tuckus and hunt down one of my knitting reference books to correct that one. 

The remaining two are more troublesome and now it comes to mind that I have had similar errors in the pasts and wondered how to remedy them.

2.) My short rows have little holes at the ends.  See.

Short rows are where you have to turn before you reach the end of the row. I hope the pic isn't too dark but those big holes are where I had to turn to make each short row.

In order to do the curve of the neckline one must knit short rows at the back nape area.  The curvature was successful but it created little holes.  Does anyone utilize the short row technique in their knitting often enough to tell me how to get around this?

3.) The next mistake is another hole.  Whenever I pick up an inside corner I get a hole.

This is the inside corner of the neckline.  It isn’t an obvious spot and not too noticeable when worn, but whenever I pick up an inside corner, it elongates that area and pulls apart the knitting making a hole.  Again, does anyone know how to remedy this?


It is hard to see in the pic even after I blew it up, the little white spot between my fingers is the offending hole. Like a shawl collar in sewing this pattern had a squared off inside corner and when I picked up the stitches to make the ribbing this hole was created.

I always seem to encounter problems that aren’t discussed in the manuals. I know a lot of sewers are knitters also, and I would love to hear from you on these two tricky techniques. 🙂

Butterick 5772: Attaching the band to the beret.

Butterick 5772:Children's Winter Hats

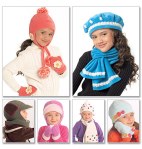
This pattern provides several different hat styles and most are self-explanatory but the beret does have a few quirks. 


First: the undercap.

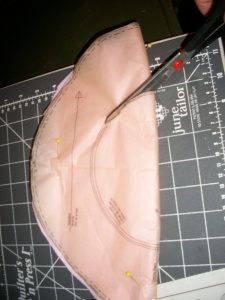
Butterick 5772: The undercap of the beret must have a hole for the head cut out. I found it helpful to fold the cap in half.

Fold the undercap portion in half to cut your inside circle.

Second: the band.

Knowing from previous options that the bands sometimes did not fit well I was leary that the band would not correctly fit into the undercap circle of the beret.  This is how I made sure the band matched the beret circumference.

I marked the back and front center with a pin.


I began sewing the band about two inches from the center back and sewed around until I was nearly 2 inches away from the center back.

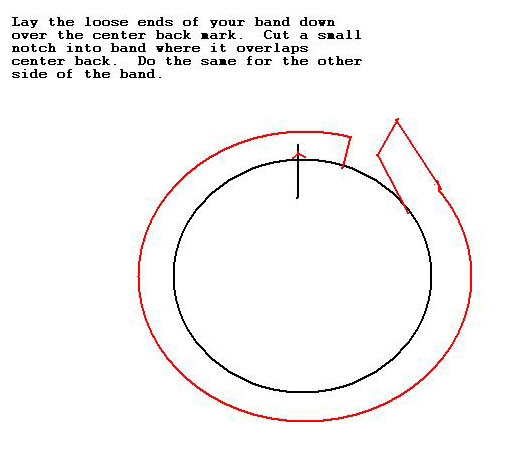
The next step I will explain and draw in paint the best I can, though I realize that the illustrations make much more sense if you have the actual pattern pieces in front of you. 

I layed the loose ends of the bands down and cut a small notch into them at what would be the bands center back seam.

Then I sewed the band center back seam.

The band fit the circle perfectly since it was custom fit.

It took just a few extra moments and I didn’t have to worry about a mismatch that wouldn’t “ease” into the undercap. Of all the options offered the beret is middling in difficulty and time, but my daughter’s pleasure with it made it worth a few extra moments.

Next Post: Tuesday, November 9, 2010:Sloping Shoulder Alteration


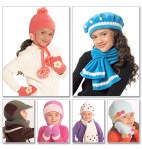
McCall’s 5772 Child’s Polarfleece Hats: Pattern Review

McCall’s 5772 Child’s Polarfleece Hats

McCall's 5772 Winter Hats for Children

My daughter requested the beret on this pattern front as she browsed a kid’s pattern catalog at the fabric store.  The Halloween frog costume provided extra fleece as I had to buy at least a ¼ yard cut but barely used any in making the small froggy spots. I am currently on a fabric stash bash and don’t want any spare material around gathering dust.  So I decided to not even try to find a place to store the leftover fleece, but immediately sought a way to use it up.  I remembered this pattern and thought this would be a good time to make wearable muslins of each style.  I have made all of the styles except I ran out of material and couldn’t cut a visor for options E and F.

None of the hats pictured have decorations as this will take much considering and reconsidering on my daughter’s part as she rummages through my buttons and trim.  Should keep her occupied a good 30-45 minutes.  🙂

McCall's 5772 Option C with mittens: I have to make and add yarn pom poms.

Pros:

  • Finally a use for remnant fleece.
  • Lots of potential for cute little girl decorations.
  • All of the hats include a lining pattern.
  • If you don’t have enough material or want an extra quick project, you can ditch the lining.
  • Fleece does not require a seam finish.

McCall's Option B: My favorite because it is the easiest.

Cons:

  • The bands are often too small for their caps.  Cut extra length just in case.
  • The pattern instructions tell you to sew in the round attaching band to cap as you do a set-in sleeve.  I think manufacturers must sew these hats flat and wish the patternmaker had gone that route.  
  • I cut a large for my size five daughter and found the heads to be a bit peaky.  You can cut some excess off the bottom band or bottom edge of the cap if that is a problem for you.
  • I took about three inches off the circumference of option E/F which made for differently sized triangular portions.  I thought three inches was a lot to remove for my daughter’s average size head.

Some Assembly Required:

I followed the pattern instructions overall except I did not sew up the last seam of the cap.  Instead I left that seam open, attached the bands, and then sewed both band and cap at back center seam.

Fabric:

Leftover polarfleece.

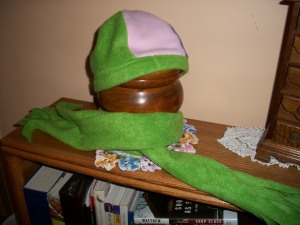
McCall's 5772 Option E/F and scarf: I had to remove three inches of circumference which made the back triangles a different size than the rest. Thankfully this is only a wearable muslin and my daugther will probably lose it as quickly as I made it.

Finetuning:

I am going to cut extra length in the bands next time.  Possibly I will cut some depth off the bottom of the cap also. 

Will I Sew it Again:

As my daughter loses hats often I think I will be making many renditions.

Advice to Others:

 You must sew every seam at 5/8 inch.  Then grade the seam edge back.  If you don’t sew at the 5/8th that the pattern

McCall's 5772 Option A: The beret my daughter wanted. She choose the pink fleece. I will go over how to match the band to the undercap on Saturday's post.

was created for you will get a different circumference than intended.

Most of the options are self-explanatory but the beret does have a few quirks. I will go over sewing the beret in Saturday’s post.

Overall Style Grade:  A, this is a cute classic style for small children.   Results Grade: A, easy for beginners and a nice break in between tougher projects for long-time sewers.

Next Post: Friday, November 5, 2010: Week Eight of my Stash Bash.   Then Saturday, November 6, 2010:Fitting a Beret Band Perfectly to the Undercap.

Butterick 3238 Animal Costume for Halloween:Pattern Review

Butterick 3238 Animal Halloween Costume

Years ago I had made my sister-in-law a lion costume when her department at work wanted to enter a Halloween contest using a Wizard of Oz theme.  I remember my mother, sister-in-law and myself chatting pleasantly as I sewed up the costume in a few hours.  I’m not bragging.  It was that easy.  The fabric was cheap, I knew she would only wear it once, and the polarfleece required no fancy sewing or seam edging.

So when my daughter wanted to be a Littlest Pet Shop frog for Halloween I wasn’t too daunted.  Holding out for dirt cheap pattern sales in October,  I was rewarded with a 99 cent Butterick pattern that gave several animal variations. 

The only thing was how was to get a frog from a costume originally patterned for bunnies, lions, cats and dogs? 

I decided that the ears would become eyes.  I took the bear ears, rounded them down a bit asymmetrically and then pulled out one of those Littlest Pet Shop toys and copied the eyes. My eyes came out more like Kermit the Frog, but at least they looked froggish.

Animal ears became frog eyes. The red party blower as a froggy tongue was my husband's idea.

Pros:

  • Polarfleece requires no seam edging.
  • Sewing flaws won’t matter so much as costumes are only worn once.
  • People won’t even see the sewing flaws.
  • Very little fitting is involved.
  • Polarfleece is warm if the weather is cold.
  • The pattern can be adapted to other kinds of fabric, like the slinkier colorful knits also available around Halloween.  

Front view of Butterick 3238: My daughter running off with her loot!

Cons:

  • Polarfleece is often on sale, but can also run around $13.00 per yard in my area.
  • It can be hot if the weather is good.
  • New sewers might be intimidated by the number of pattern pieces.
  • It requires a zipper.  However since it is just a costume consider this a good time to practice inserting zips into polarfleece.

Some Assembly Required:

  1. I assembled the front fully including zipper and front sleeve portion.
  2. Then I sewed the back fully; center back seam, and back sleeve portion.
  3. Took a little break and constructed the eyes out of the ear pattern.  I appliquéd using a zig-zag stitch then placed the eyes on the front band of the hood.  This took some pinning and wrapping around my daughter’s head for correct placement.  I stuffed the eyes with a little batting for some extra heft.
  4. Next the hood ; back center seam first, then attach to front band that has the eyes/ears basted on. I waited to sew up the little forehead dart until after I had the spots on. 
  5. Now it was time for spots.  I and my husband cut different size circles and my daughter got to choose placement for the front.  (Much dickering and bickering was involved with this as she kept repositioning – so I quietly spotted the rest of the garment myself.)  I applied the spots to the flat back and front, and also to the constructed but still unattached hood.
  6. I looked at my daughter’s lunch bag to check out the font for the LPS symbol.  Then I played around in WORD getting the size and font right, printed off and cut the pink polarfleece using the print off as a template.  I zig-zagged stitched the letters down the middle.
  7. Now came time for attaching everything.   I was thankful as I knew this part would go swiftly. I sewed down the arms, attached the hood to the neckline, then sewed underarm through side seams, and the inside legs last. 
  8. At outset I had hoped that the wrists and ankles would work without elastic but they were too loose.  This was a bit fussy but as I have seen costumes with exposed elastic don’t sweat this if your application isn’t perfect. I zig-zagged the elastic to the fabric front edge and then flipped it and zig-zagged it again from the top hiding the elastic under the fabric.  I cut 9-9.5 inches for each wrist and ankle opening for my size five daughter. 

Fabric:

Polarfleece.  The sale stuff and for once I did not buy extra as I didn’t want loads of bright green plush fleece hanging around.

Back view of Butterick 3238:My daughter trick or treating with her best buddy.

Finetuning:

One of the store employees was restocking in front of the zipper bin when I choose my zip and she wouldn’t move even as I peered around her.  I snagged a 14 inch green plastic zip but mistakenly got a separating zipper.  I made it work but did have a bad moment when my machine needle skimmed the zipper stop and seized up.  Use a non-separated zipper. 

Also I did not use Velcro on the hood fastening.  I sewed on big snaps.  I don’t like sewing on Velcro and it catches my daughter’s long hair. 

I wish I had moved the LPS symbol up higher on the chest but I was very pleased when our trick-or-treating companions recognized the logo without hesitation.

I purposely moved the zipper top down about an inch from the hood closure.  Two reasons: I didn’t know how that attachment was going to go; and, I remember suffocating in Halloween costumes as a child and I wanted my daughter to have a little airhole since she was going to be in such a thick fabric.

Will I Sew it Again:

That’s up to my daughter and her upcoming Halloween ideas.  I’m keeping the pattern around since it will be easy to grade up over the next few sizes.

Advice to Others:

Purchase the correct zipper.  Consider snaps instead of Velcro if you are cool with spending a little time handsewing. Get your kid to help cut out the pattern.  Purchase some heavy-duty sewing machine needles and resign yourself to changing up a few times over the course of your project.

Overall Style Grade:  This is not a style, it is a cute, classic Halloween costume.

Results Grade: A, beginning sewers who have sewn simple long sleeve shirts should find this pattern approachable, and intermediate sewers will have fun with ornamentation as the construction will be old hat to them.   My daughter’s costume looked like the storebought ones other kids were wearing that night.

Next Post: Thursday, November 4, 2010: Getting back into the swing of things I don’t know what I am going to sew next.

Seeing Spots!

I have been sewing so many spots . . .

that I am beginning to see spots!

My daughter wants to be a Littlest Pet Shop character for Halloween and I have the body of the costume done which went rather quickly.  But I underestimated how long adhering spots to a frog might take. 

Still sewing most of today. 

I will post the completed costume (I hope!!!) on tomorrow’s stash bash update or on Tuesday.  I’ve an out of town memorial service to attend this weekend so I am foregoing the usual Saturday post. 

Next Post: Friday, October 29, 2010:Week Seven Stash Bash Update.

Previous Older Entries